

Getting your funds off an exchange shouldn't be stressful. Whether you are moving profits to a cold wallet for long-term storage or sending USDT to a friend's account, understanding how to withdraw your crypto safely is a mandatory skill for any trader.
At Tapbit, we offer two distinct ways to move your assets: On-Chain Withdrawals (to external wallets) and Internal Transfers (to other Tapbit users).
Here is your step-by-step roadmap to executing both methods securely and efficiently.
Method 1: How to Withdraw Crypto to an External Wallet (On-Chain)
If you are transferring assets to a personal Web3 wallet (like MetaMask or Trust Wallet), a hardware wallet (like Ledger), or another exchange, you need to use the On-Chain withdrawal method.
Follow these steps to ensure your funds reach their destination safely:
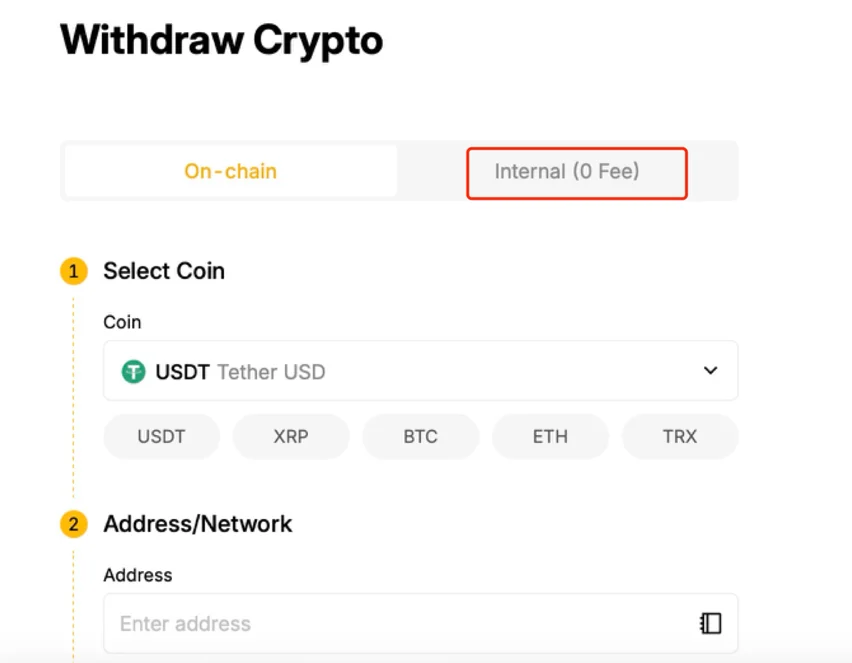
STEP 1: Pass Security Clearances
Before moving any funds, log in to your Tapbit account and navigate to the 'Assets' dashboard. Click the 'Withdraw'button and ensure you are on the 'On-chain' tab.

Security First: Cryptocurrency transactions are irreversible. To protect your funds, Tapbit requires you to set up a withdrawal PIN and bind Two-Factor Authentication (2FA) before unlocking the withdrawal feature. If you haven't done this yet, check out our guide on setting up 2FA.
STEP 2: Select Your Asset and Network
This is the most critical step in the entire process.
-
Select the specific cryptocurrency you want to withdraw (e.g., USDT).
-
Choose the blockchain network.

Crucial Warning: The network you select on Tapbit must exactly match the network of your receiving wallet. For example, if you are sending USDT to an Arbitrum (ARB) address, you must select the Arbitrum network on Tapbit. Sending funds to a mismatched network will result in permanent loss of assets.
STEP 3: Enter the Destination Address
Open your receiving wallet (or external exchange) and locate the "Receive" or "Deposit" function. Copy that address and paste it directly into the 'Withdrawal Address' field on Tapbit.
(Always double-check the first four and last four characters of the address after pasting to ensure no malware has altered your clipboard.)
STEP 4: Specify Amount and Confirm
Enter the exact amount you wish to withdraw.
Take a moment to review the Network Fee (Gas Fee) displayed on the screen. Please note that gas fees are not charged by Tapbit; they are dynamic costs paid directly to blockchain miners/validators to process your transaction. The system will automatically calculate the final amount you will receive after the fee is deducted.
Once you have verified the address, network, and amount, click Withdraw and enter your 2FA/PIN to finalize the transaction. On-chain processing times vary depending on network congestion.
Method 2: How to Send Crypto to Another Tapbit User (Internal Transfer)
If you are paying a freelancer, sending crypto to a friend, or moving funds between your own Tapbit sub-accounts, you should use the Internal Transfer feature.
Internal transfers are processed instantly and carry zero transaction fees, making them the most cost-effective way to move assets within the Tapbit ecosystem.
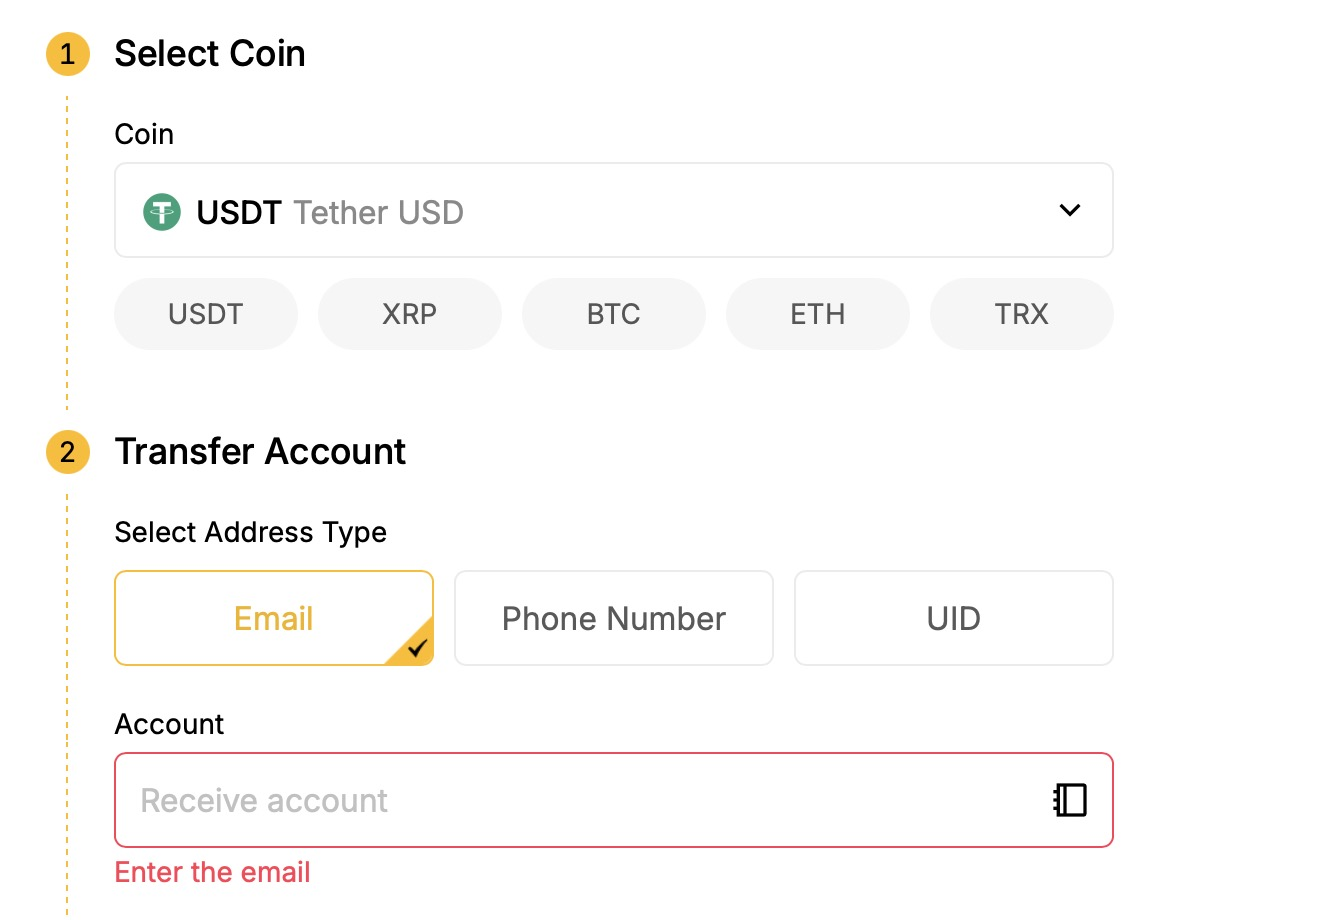
STEP 1: Switch to Internal Transfer
Navigate back to the withdrawal section in your 'Assets' dashboard, but this time, select the 'Internal' tab.
STEP 2: Enter the Recipient’s Details
Choose the asset you want to send. Instead of a long, complicated blockchain address, simply enter the recipient's Tapbit account identifier. You can use their:
-
Registered Email Address
-
Registered Phone Number
-
Unique User ID (UID)
STEP 3: Confirm and Send
Enter the transfer amount and carefully verify the recipient's information. Click 'Confirm', complete your security verification (PIN/2FA), and the funds will appear in the recipient's Tapbit wallet immediately.

Tapbit Pro-Tips for Safe Withdrawals
To trade like a professional, adopt these fundamental security habits:
-
The Test Transfer: If you are moving a large amount of capital to a new address for the first time, always send a tiny test amount first. Once the test arrives safely, send the rest.
-
Whitelist Your Addresses: Use Tapbit's Address Management feature to whitelist your frequently used external wallets. This adds a layer of convenience and prevents you from accidentally pasting the wrong address in the future.
By mastering these two withdrawal methods, you take full control over your digital assets.
Are you ready to manage your portfolio? Head over to your dashboard to view your balances, or register a new Tapbit account today to experience secure, high-speed cryptocurrency trading!
Frequently Asked Questions (FAQ)
How much does it cost to withdraw crypto from Tapbit?
It depends on the method you choose. Internal transfersto other Tapbit users are 100% free and carry zero fees. For On-Chain withdrawals to external wallets, you will pay a network gas fee. Tapbit does not profit from this; the fee goes directly to the blockchain validators processing your transaction. The exact fee fluctuates based on current network congestion and will be clearly displayed before you confirm the withdrawal.
How long will it take for my withdrawal to arrive?
Internal transfers between Tapbit accounts are processed instantly. On-chain withdrawals generally take anywhere from 3 to 30 minutes. However, this relies entirely on the specific blockchain you are using (e.g., Tron or Solana transactions will confirm much faster than Bitcoin or Ethereum during peak hours).
Why is my withdrawal locked or showing as "Pending" for a long time?
If your account withdrawal function is locked, it is likely a security measure. To protect your funds from hackers, Tapbit automatically suspends withdrawals for 24 hours after you reset your password, change your Two-Factor Authentication (2FA), or update your bound email/phone number. If your transaction says "Pending," it is usually just waiting for standard blockchain confirmations.